

How To Add Blog Posts To Wix
How to Create a Website Using Wix in 2021 (Step-by-Step Guide)
If you want to build a website using Wix, you're in the right place!
Wix is a simple drag and drop website that makes it easy for anyone to quickly build a website without any coding or design skills.
Even though Wix is so easy to use, it can be intimidating when you're just getting started, especially if you've never made a website before. So I created this step-by-step guide for beginners to talk you through the whole process.
In this tutorial we're going to cover:
- Signing up with Wix
- Choosing a template for your Wix site
- Introducing the Wix site builder
- Using Wix Artificial Design Intelligence (ADI)
- Customizing your Wix site
- Publishing your Wix site
- Managing and updating your Wix site
Why Build a website on Wix?
Before we get started, it's worth taking a few moments to consider why you might want to create a website on Wix and if it's the right choice for you.
Wix is a drag and drop website builder, which means you can design your website visually by moving around page elements and typing directly on screen, rather than having to use code.
When you sign up for an account with Wix you'll get access to a library of over 800 pre-designed templates to get you started. You can use these templates as they are or customize them to create a more unique design.
The Wix site builder is very intuitive and easy to use for beginners, and yet it offers a lot of flexibility for those who want more control over how their site looks.
With Wix you don't need to worry about buying web hosting or installing software, you just sign up and go. So it's one of the easiest ways to get started online.
You can get started and build your first website on Wix for free. Wix free sites are given a Wix subdomain (like websitenewbie.wixsite.com) and have Wix brand ads on them
If you want to remove the ads and use your own domain (like "mywebsite.com") or set up an online shop, you'll need to pay for one of the premium packages starting from $4.50 a month.
Some of the other great features you get with Wix include:
- An AI site tool that will create a unique web design for you
- Manage everything in one place including hosting, security, email, and analytics
- Access to a comprehensive knowledgebase, with a support team on hand when you get stuck
- Tools for SEO, email, and social media marketing
- Integration with over 250 apps to add extra functionality to your site
Wix is a great solution if you want a quick and easy "hands-off" way of building a website. It can be used to build:
- Personal sites
- Business sites
- Blogs
- Online stores
- Galleries and portfolios
- Membership sites
- Booking sites
- Event sites with ticket sales
- Music or video sites with membership or digital product sales
- Restaurant sites with reservations and online ordering
However, Wix isn't the best choice for everyone. If you want full control and flexibility over your site or you're building a large or complex site, building a site with WordPress might be a better option for you.
Not sure which platform is best for you? Take a look at our detailed comparison of Wix and WordPress.
Okay, if you're ready to give Wix a try, let's get started! You'll be up and running with your very own website in no time.
1. Signing up with Wix
Head over to Wix.com and hit the blue "Get Started" button.

You'll be taken to the sign up screen where you can either create a new Wix account or sign up with your Facebook or Google account.
After you've created a new account or linked one of your social media accounts, you'll be taken to a quick questionnaire. You can skip this step but it's best to complete, as it will customize Wix to best fit your needs.

The questionnaire will ask you questions about who you're creating a site for, what kind of site it is, and your experience building websites.
You'll then get the option to go ahead and get started with a template and the Wix drag and drop editor or use the AI-powered website wizard, called ADI, which will automatically create a site for you.

We'll look into Wix ADI shortly, but let's start by getting acquainted with the Wix site builder.
2. Choosing a Template for Your Wix Site
Click the blue "Start Now" button and you'll be taken to the Wix template directory where you can start browsing through some site designs.
The templates you're shown first depend on your answers to the site setup questionnaire, so I'm seeing blog site templates here. But you can still browse and choose from other types of site template such as business, store, creative, or community.

You can browse through all the themes until you find something you like the look of or search by keyword like "food" or "tech" if you're building a site with a specific theme.
To get a better look at each theme, hover over the thumbnail and click the "View" button.
If you've got previous experience building websites or you want to have more creative freedom, take a look at the Blank Templates.

These templates provide you with a basic layout and you can create your own design by adding images and changing colors, fonts, and other design elements.
Once you're a Wix expert you can opt to start from scratch and build your entire website from a blank slate.
3. Introducing the Wix Site Builder
After choosing a theme and clicking the "Edit" button, you'll be taken straight into the Wix drag and drop site builder.
So let's start by helping you find your way around the dashboard.

Area 1 in red is your main Wix account menu. From here you can view and restore previous versions of your site, connect a domain, setup email, improve your SEO, manage your social media accounts, and all other aspects of site management.
In this menu there are also links to help articles and videos, upgrade your plan, hire a professional for help with design, development, or marketing, and "Dev Mode" which takes you to Corvid – Wix's web application development platform. Ignore this unless you know what you're doing!
Area 2 in blue has links to control saving your design and publishing your site. You can save at any time (there are also regular pop-ups reminding you to save your work) and preview your site to see how it will look without all the editor tools getting in the way.
Area 3 in green is a secondary menu that helps you while you're building your site. You can change the tools visible on screen (including layers, rulers, and guidelines), zoom out and reorder sections on the page, change the page you're working on, switch to desktop or mobile view, undo or redo your last change, and search for tools, elements, and help articles.
Area 4 in purple is a real-time preview of what your site looks like. As you make changes, you'll be able to see them immediately without needing to click the preview button
Area 5 in yellow has buttons to add and edit elements on your site. Here you've got easy access to:
- Menus and pages – add a new page, change the page you're working on, edit your website menus, and add a visual transition for clicking between pages.
- Page background – choose a color, image, or video for your background. Wix provides a library of high-quality images and videos for you to use. You can also upload your own files or import from stock directories.
- Add – add any element for your web page here. This includes text, images, buttons, boxes, galleries, slideshows, forms, etc. Keep in mind that you'll need to upgrade to a paid account to use some interactive elements such as booking forms or online stores.
- Wix app market – this lists third-party apps you can integrate into your site for analytics, chat, marketing, etc.
- Media – a directory of free and premium stock images and videos with tools for editing them.
- Blog manager – create and mange your blog posts, add a page to your blog, or add blog elements like an archive, recent posts widget, or category menu.
Area 6 in turquoise contains tools for customizing elements of your site design. You can drag this toolbox around to anywhere you want on the screen. It includes tools such as copy and paste, change the alignment or order of your page elements, rotate or flip, and resize
3. Using Wix Artificial Design Intelligence (ADI)
The wizard starts out by building on the information it already has from the initial questionnaire (if you filled it out).
When setting up my account, I indicated that I wanted to create a blog so at this point I'm asked to narrow down the type of blog I want to build.

As you type, the wizard will attempt to auto-complete what you're typing, so you can choose an appropriate category from what comes up. I entered "Lifestyle Blog".
On the next page, you'll be suggested some features that might be suitable for your type of site. For my lifestyle blog this was a subscription form to add visitors to my mailing list, a live chat box, and an Instagram feed. I decided to choose the subscription form and Instagram feed.
You can choose whichever features you want by ticking the checkbox in the corner. Or, if you don't want any extra features, simply click the "Maybe Later" link to skip this step.
If you don't see the features you want on your site, scroll down to see more options. Features available to add include
- Online store
- Bookings
- Video
- Events
- Pricing Plans
- Forum
- Music
- Tour dates
- Menus
- Orders
- Reservations
- Groups (communities)

When you click the blue "Next" button, you'll be asked for the name of your blog, so go ahead and type it in. If you're not sure what to call your blog yet, don't worry – you can change this later.

Click the next button. You'll now have the chance to import content from your existing blog, if you have one. I'm starting from scratch, so I clicked the skip link to move onto the next section.

The next screen asks for details such as your email address, address, phone number, social media accounts, and logo if you have one.
Obviously you don't have to enter your personal address and phone number, but this is useful for business blogs.
When you click the next button, the boring part is over and it's onto the fun stage – generating your design!
Here you'll get to pick a color scheme and fonts to match the look you're going for on the site. Don't worry too much about this, as they're easily changed later.

When you click the continue button, Wix will go ahead and start generating some layouts for your new site. This will take a few moments, so be patient.

Choose your favorite layout and don't worry if you're not keen on colors and fonts. You can customize these later.
You then have the option to add pages to your site. Some of these pages are pre-formatted for common use (e.g. contact page) and you can also add blank pages and customize them for your own use later. I'm going to add an About page and a Contact page to my blog. If you don't want to add any pages at this stage, you can click the skip link in the bottom right.

Once you've chosen your pages, click the "Edit Site" button to see the full design and make any changes and customizations you wish. This will take you back to the Wix site builder as covered previously.
4. Customizing Your Wix Site
Okay, so now you know your way around the Wix site builder and you have a template or ADI-site to get started with, let's take a look at some of the customizations you can make.
Let's start by editing the site header. I can adjust the look and behavior of the site header by clicking on it. There's then a pop-up with buttons to change the header design, the settings, or the design.

If you click the "Change Header Design" button you can adjust the colors and style of your header. The pop-up will list a selection of designs to choose from, and then you can click the "Customize Design" button to make further changes to the width, opacity, border, corner style, and shadows.
The changes will happen automatically when you click, or you can preview the changes by hovering.

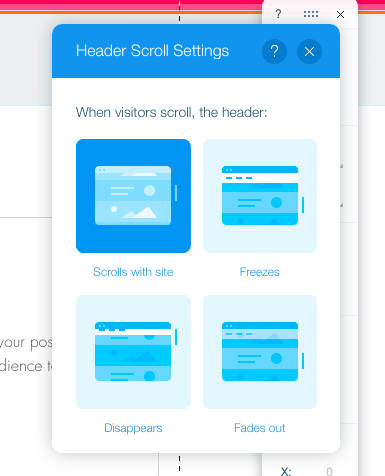
In the design I've chosen, the header scrolls with the rest of the site, but I can change this by clicking the settings button.
The color of my menu text now needs changing, so I can adjust that by clicking directly on the text and buttons will pop up for manage menu, navigate, layout, design, animation, and stretch.

I can change the text color by clicking the design button, clicking customize design, selecting text, and changing the color for regular, hover, and clicked links.

I can also choose from a preset menu design with a selection of styles and colors, just as I could for the header.
On the menu pop-up, you can also change the pages that are listed in the menu, the menu alignment, add animation effects, and make it full-width if you wish.
Okay, let's move on from the header and add a background image. You can do this either by clicking on the "background" button on the left hand side or by clicking anywhere on the background of your site and then clicking the "change page background" button.

In the pop-up that appears I can choose a background color, image, or video. Wix already provides its own library of images and videos so you don't have to go trawling through stock sites.
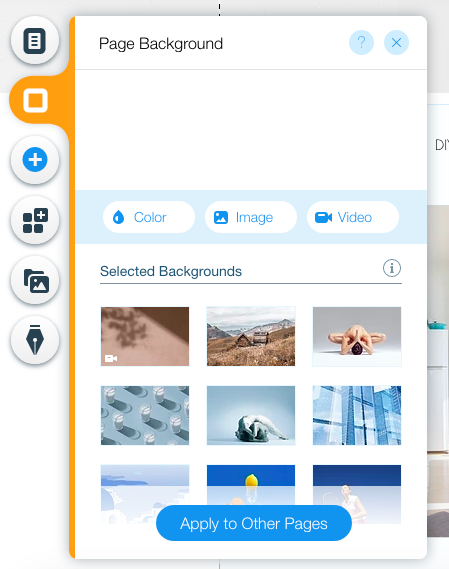
If you don't like any of the options shown, you can click on the image or video buttons to browse or search the entire media library, upload your own images, import from the popular stock photo site – Unsplash, or buy a premium image directly from Shutterstock.
I'm going to look for a cherry blossom image to match my pink header, so I'll go ahead and search for this in the media library.

When you find an image you like, select it and click the "Change Background" button.
This blog design came with it's own pre-set title and you'll probably want to change that. To edit text on your site, just click on it. You can then click the edit text and type over it directly. You can also change the font, size, color, and style from the pop-up.
Okay, I've adjusted my site header, menu, and background, and now I'm going to add a new text box.
To do this, just click the "Add" button on the left, choose text, and select heading, title, or paragraph. You can then adjust the size and position of your text box by clicking and dragging and style it as you wish.

One interesting function of Wix is that it will auto-suggest website copy for you if you're not sure what to type into a text area. Let's try this out – click your text box and click the "Get Text Ideas button".
In the pop-up that appears, you can then type in a description of your site, and the topic of the text and Wix will suggest some copy for you.
I chose welcome text for design blog and it came up with three different options.
The first is: "We are all told, "live your life to the fullest"; I am here to do just that. YOUR BUSINESS NAME serves as a vessel to project my passions, and clue in my loyal readers as to what inspires me in this crazy world. So, sit back, relax, and read on."
Not bad right? This is quite a handy feature to get you started if you just don't have a clue what to write on your site, and of course you can edit it as much as you wish.
I'm not going to go into every single thing you can do with the editor, but you should now have a pretty good idea of how to customize different elements of your site.
If you get stuck at any time, just click the help button that appears when you click on any element and you'll be taken directly to a relevant article on the help center.
Wix also has a library of videos that talk you through all features of the site builder and how to make any customizations you wish. You can access this from the help link in the main menu.

6. Publishing Your Wix Site
Once you're happy with the design of your new site, it's time to make it live! Go ahead and click the blue publish button in the top right hand corner.

You should then get a message saying that your site has been published, with a direct link to it. Let's take a look at our site.

You can go and check it out for yourself at https://deletia7.wixsite.com/mysite
7. Managing and Updating Your Wix Site
At this point you can continue with your free Wix account or upgrade to a paid account. If you want to remove the Wix ads, use your own domain or have functionality like an online store, you'll have to upgrade. You can do this at any time by clicking the "upgrade" link in the main menu of the site builder.
Premium plans range from $4.50 to $24.50 a month for basic sites (note, the cheapest package includes Wix ads) or from $17 to $35 a month for a business or eCommerce site that takes online payments.

All yearly and unlimited accounts at Wix are currently 50% off so it's a great time to sign up.
Apart from upgrading your site, you'll find most of the other options for managing your site under the "Settings" link in the main menu of the editor.
Once you've set up your site, you probably won't need to change much apart from making slight edits to text or adding a new page every now and again. You can do all this easily from the editor.
To add new blog posts, you can do this easily from the blog manager button on the left-hand side of the editor.
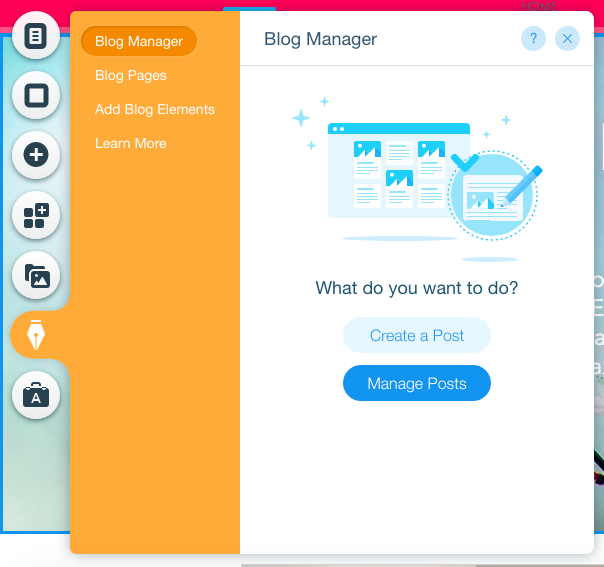
This will take you to the blog manager where you can add new posts, edit existing posts, and schedule posts for future publication.

The blog post editor is very simple to use and similar to many other blogging tools. You can simply type text, style it with the visual editor, and add new blocks for images, videos, galleries, etc.

FAQ
Is Wix good for building a website?
Yes, Wix is a great tool for building a website if you don't have any previous design experience and you don't need to know how to code either. Wix uses its own hosting platform and hundreds of pre-designed templates for you to use so everything is easy to use and in one place.
How much is it to create a website on Wix?
You can create a website on Wix for free but it will have Wix ads on it and you can use your own domain on a free account. Premium plans start from $4.50 a month.
Is Wix bad for SEO?
Some people think that Wix websites don't appear as high in search results as sites built on WordPress or other platforms. To date, there's no real proof if this is true or not. If you want full control over SEO and other aspects of your site, it's probably best to go with WordPress. However if you just want a quick and easy way to make a site and you're not fussed about the technical details, Wix is fine for most people
Why is the Wix editor so slow?
As the Wix editor makes changes in real-time, you might have to wait a few moments for it to load. This also depends on the content of your site (large images take longer to load) and how fast your internet connection and computer are.
Is Wix owned by Google?
No, Wix is an independent company, based in Israel.
Do professional web designers use Wix?
Some professional web designers do use Wix to build sites, particularly if they don't have strong coding skills. However most technical web developers prefer to work on WordPress or another platform.
How To Add Blog Posts To Wix
Source: https://www.designbombs.com/create-a-website-using-wix/
Posted by: weekslontoll.blogspot.com
0 Response to "How To Add Blog Posts To Wix"
Post a Comment