

What Is Iso On My Camera
ISO is one of the virtually important concepts to understand if yous desire to create ameliorate photographs, and Especially if y'all want greater manual command over your photographic camera. Adjusting your ISO speed tin can relieve an otherwise unobtainable prototype…or completely destroy your item if you don't know what you're doing.
If you're searching for a comprehensive guide on what ISO actually is, why it's important for landscape photography, and when you should (and shouldn't) adjust it ….then this is the guide for you.
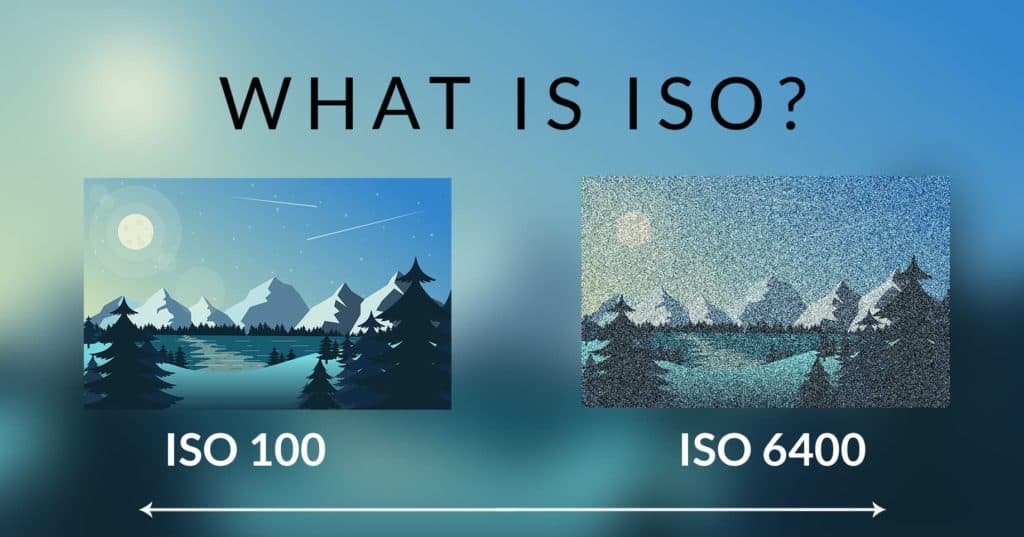
Table of Contents
- ane. What is ISO Speed in Photography?
- The Definition of Camera ISO
- The Typical ISO Range
- Native vs. Extended ISO
- ii. Why ISO is So Important in Photography
- A Brighter Image = More than Creative Options
- ISO can Help to Freeze Movement
- 3. What Happens When I Increase ISO?
- ISO Amplifies Existing Racket
- Is it Okay to Have Noise in My Photograph?
- The Best ISO Setting for Mural Photography
- 4. How to Minimize Noise from ISO
- Removing Racket in Mail Processing
- Sensor Size and Noise from ISO
- five. When Should I Increase my ISO?
- General Recommendations
- Increasing ISO for Handheld Photographs
- Increasing ISO When Camera is on a Tripod
- How to Choose the Best ISO for Your Scene
- 6. Summary
1. What is ISO Speed in Photography?
The Definition of Camera ISO
Here's the simplest explanation: increasing your ISO speed is an artificial style to burnish your photograph without having to change your shutter speed or aperture. We'll discuss why retaining your discontinuity/shutter speed is and then of import afterwards, simply for at present….just know that ISO is an alternative way to obtain the proper exposure (level of brightness).
Many articles refer to ISO as a way to increase the SENSITIVITY of your sensor to the available light (in other words, to make the sensor absorb more light), simply this is incorrect.
The rate of light assimilation by your sensor is set by your discontinuity and shutter speed. ISO tin can "amplify" this light even further, but it comes at a cost: an increase of digital noise.
It's a flake like artificially increasing the exposure of a raw file in Lightroom or ACR; yes, your paradigm becomes brighter, only it chips away at the quality when compared to an prototype that was actually exposed to more light in the field.
So although ISO is part of the "exposure" triangle, it does not influence the actual exposure. Only your aperture and shutter speed command the amount of light that actually hits the sensor.
We'll discuss the pros and cons of increasing your ISO, and when yous should (and should not) suit it….but for now, only understand that ISO is like an "emergency switch" to pull when you absolutely must increment the brightness of your paradigm to obtain a faster shutter speed and/or deeper depth of field.
The Typical ISO Range
For about professional camera bodies (either DSLR or mirrorless), the ISO range starts at the everyman "base" value. This number will depend on your camera, but about start at 100 and will increment to about 32,000.
A higher ISO number means that the camera is amplifying the light at a higher rate of intensity, making the image appear brighter for a specific discontinuity/shutter speed combination.
When yous double your ISO (i.e. from 200 to 400), yous roughly double the brightness for that prototype.
Native vs. Extended ISO
Before we move on, I should clarify that there is a large deviation in paradigm quality between "native" and "extended" ISO.
Native ISO refers to the actual, accurate range for your specific camera – commonly 100 to 32,000. "Extended" ISO is a marketing gimmick to make it appear as though the photographic camera has a larger ISO range or is otherwise a skillful performer in low light, but the results can exist disappointing. This is also known every bit "fake ISO".
Basically what happens is that the camera will perform some processing to the image in society to reduce the appearance of digital noise…but this can profoundly affect the quality of your texture, contrast and colors.
When choosing a camera for proficient ISO performance, y'all should e'er consider the native ISO, and NOT the extended.
This is, again, relatable to artificially adjusting your exposure in post-processing vs. really exposing the sensor to a different amount of light in the field. Although raw format can requite you good quality adjustments, it'due south nonetheless bogus. You lot will e'er take the highest quality when y'all capture the proper exposure with your sensor.
Cardinal TAKEAWAY
ISO gives your camera more than "breathing room" by allowing you to extend your shutter speed/aperture capabilities. Yet, this comes at the toll of added digital racket, so yous demand to weigh your options carefully. Your ISO should e'er be set to your base of operations native setting (usually 100 ISO), unless you have a specific reason for increasing it.
2. Why ISO is And then Of import in Photography
A Brighter Paradigm = More Creative Options
If y'all are able to collect more light from a scene without having to change your aperture or shutter speed to recoup, this means that you will take more leeway with the images you can create.
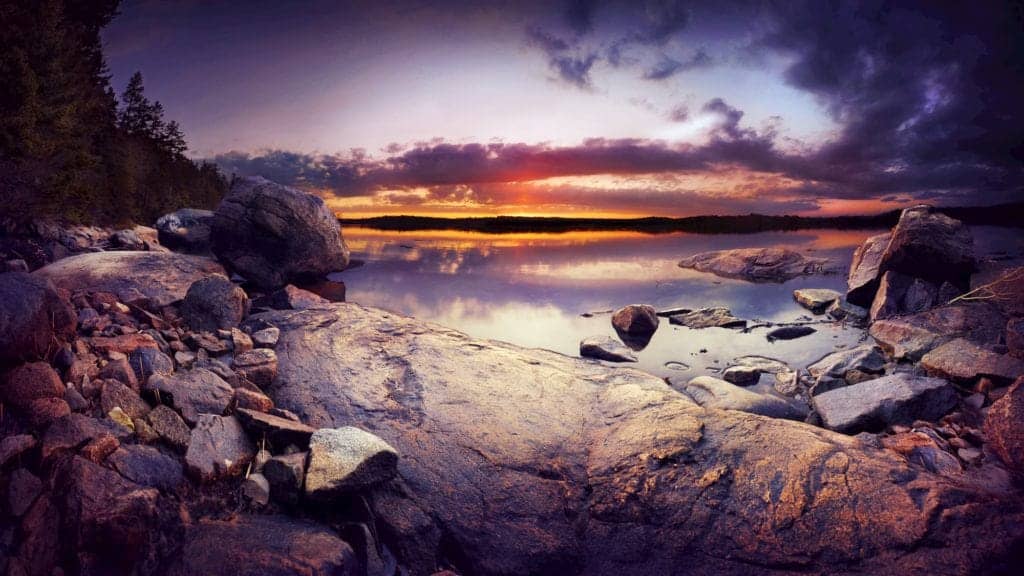
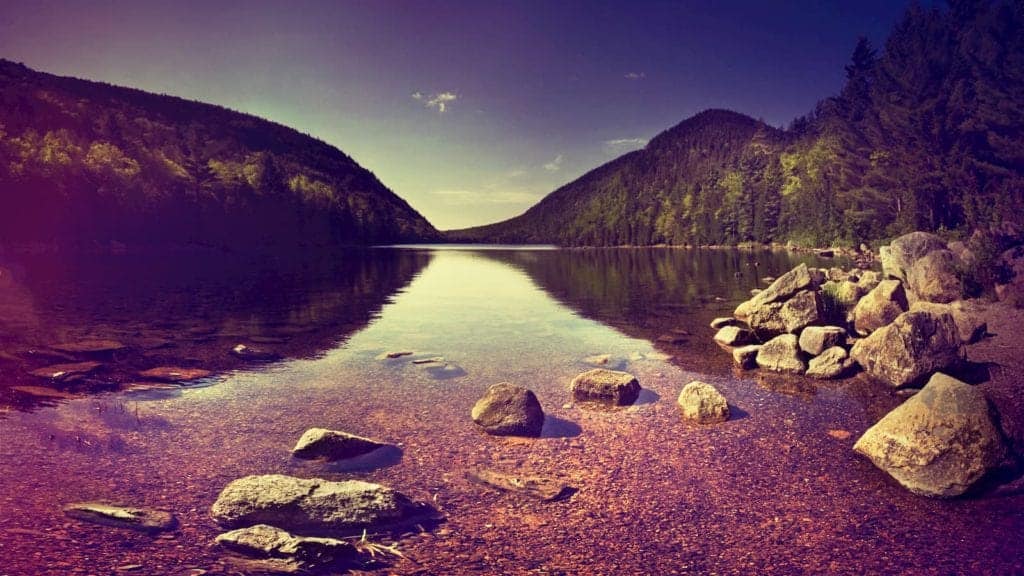
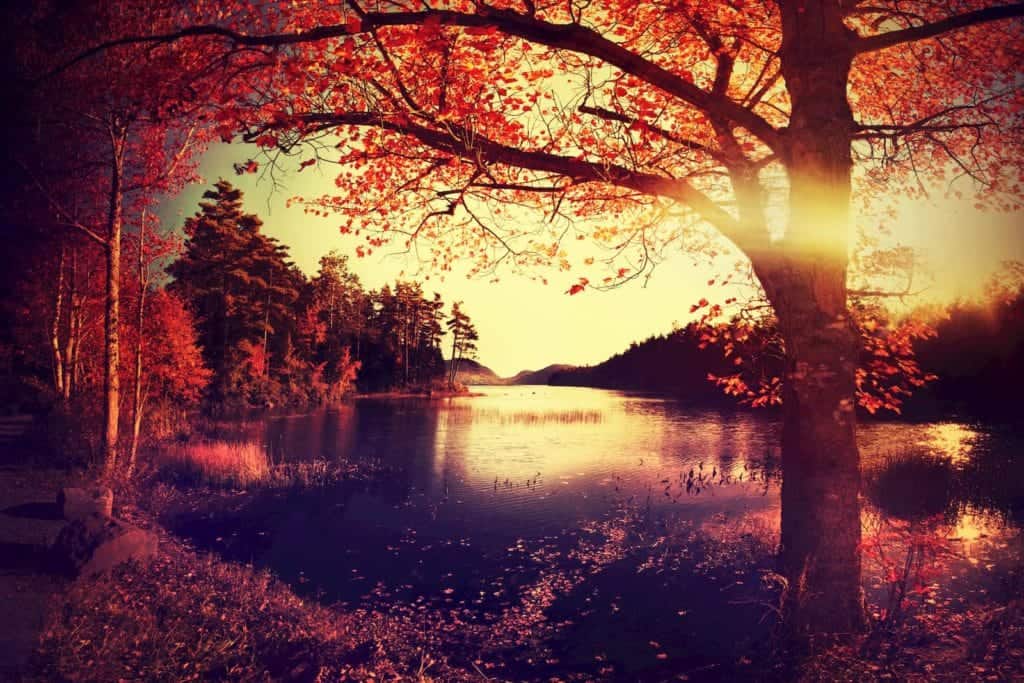
For example…the photo beneath presented some particular challenges:
(1) The corporeality of available light was low since this was photographed simply at dusk. However, I needed to retain a deep depth of field, so my discontinuity had to be pocket-sized (f/16) – which restricts the amount of calorie-free hitting the sensor.
(ii) The other challenge was my shutter speed: I needed it relatively fast in order to continue some particular in the clouds and reflection in the water. I was using a tripod, so I did non have to worry about camera shake. Yet, the clouds were fast-moving, so a longer shutter speed would have rendered those too blurry for my creative vision.
The point here is that I could not arrange my aperture or shutter speed in order to properly betrayal my prototype.
This is where your ISO comes into play as increasing it will brighten your paradigm, and give yous more elbowroom in your aperture/shutter speed.
By increasing my ISO here, I was able to:
- Retain a deep depth of field with my chosen f/finish.
- Keep my cloud detail sharp and avoid motion mistiness with my chosen shutter speed.
- Properly expose my frame in the field with my chosen ISO, giving me the highest quality item possible.
ISO tin can Help to Freeze Movement
With the images below, I wanted to keep a deep depth of field, but also capture the falling snow. Yet, since I was working with limited light, I couldn't reach a fast enough shutter speed to capture the flakes without widening my aperture – which I didn't desire to do as that would make my depth of field more shallow.
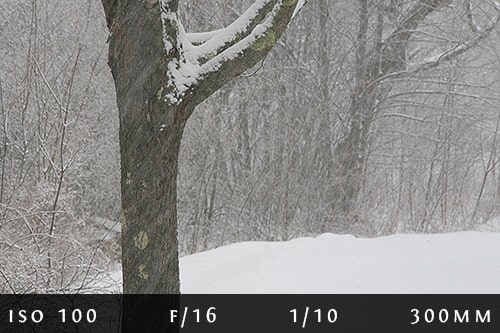
My but culling was to increase my ISO from 100 to 1600, which brightened my image essentially… assuasive me to increase the shutter speed enough to capture the falling snowflakes without (1) compromising my depth of field or (2) underexposing my photograph.
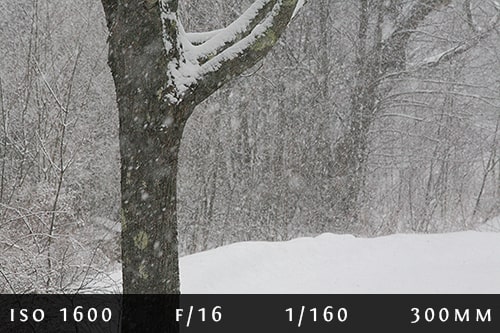
Since this was a busy scene with many lighter tones, the pixelation and racket from the increased ISO is barely noticeable – even to the trained heart.
ISO becomes especially useful when shooting handheld, as photographing with slower shutter speeds can blur your item without the assistance from a tripod. We'll hash out this more than later, only just know that increasing your ISO can allow yous to create an prototype that would otherwise non be possible…
So understanding how to best utilise ISO is VERY important to your photography, for both technical and creative purposes.
Withal, before you start increasing your ISO whenever you demand a boost of low-cal, there are some important drawbacks to consider. I've ever considered ISO to be for "emergency use only"….and y'all'll see why in the paragraphs beneath.
Key TAKEAWAY
If you must have a specific shutter speed and/or discontinuity setting, and your epitome is still underexposed (or blurry)…that is where ISO comes in for the rescue.
3. What Happens When I Increment ISO?
ISO Amplifies Existing Noise
Showtime, you should consult your camera transmission to see how to change your ISO setting as this volition differ from model to model….simply typically, there'll be a button you printing and hold, and a dial to turn to modify your ISO.
Brand sure y'all are working in manual mode, as adjusting ISO may inadvertently change your aperture/shutter speed to recoup for the increment in brightness.
The merchandise-off to increasing your ISO in digital photography is that y'all'll too be amplifying the "noise" in your image. It's the photographic camera's manner of making your image brighter without having to blot more light.
As you tin see in the correct image below, this is normally an unwanted side event: random pixels of varying brightness and color that distract from the content.
All images have some degree of noise…but when shooting at your base native ISO setting, you lot usually tin't encounter information technology. This is why programs like Lightroom volition automatically add a bit of noise removal when y'all import your raw files (we'll discuss noise removal more later).
Still, when yous increment your ISO in order to burnish the paradigm, the noise is amplified.
I should clarify that ISO is NOT the same as racket. I see the terms used interchangeably with statements such every bit "my epitome has as well much ISO", and that's not technically right. Noise is a side effect of increasing your ISO, but not all racket is caused by a higher ISO.
For example, dissonance tin also be amplified by artificially increasing the exposure of dark shadows. Very long exposures will also add racket to your prototype as the sensor heats up.
I should too note that "noise" is not the same as analog "grain". In motion picture photography (especially black and white), grain is commonly pleasing and is used for aesthetic purposes by adding texture to an image. However, digital noise is of lesser quality and appears more than pixelated than moving-picture show grain…and is well-nigh always an unwanted side-outcome.
Now this doesn't mean that increasing ISO will necessarily ruin your paradigm – in most cases, the noise will not exist very noticeable or detract from your content. And if it comes down to capturing the photo y'all desire with some noise, and non capturing it at all, I remember most will choose to handle the increment in noise.
This is why I refer to ISO every bit my "emergency switch" – the last resort when all else fails.
However, increasing your ISO should Not exist done without intent and consideration. Yous need to weigh the pros and cons depending on (1) the characteristics of the scene you're photographing, and (2) your desired upshot.
It's not just about adding dissonance to your epitome. It's also nearly degrading the overall paradigm quality – specifically, the credible sharpness of your local contrast and the overall purity of your colors.
Is it Okay to Take Noise in my Photos?
The brusque answer – aye. It depends though.
And then, you lot've increased your ISO and now you accept digital noise to bargain with. Whether or not this is a large trouble or merely a minor inconvenience depends entirely on the epitome; the texture, color, and luminosity all have a function to play in how strong the noise appears.
The first thing to consider when setting your ISO is the actual subject matter…the content of your image. Dissonance from an ISO crash-land is not always going to await the aforementioned at a given setting (let's say 800 ISO) depending on the amount of local contrast (texture and detail) in your frame.
Dissonance is more than apparent on darker tones (shadows), and when there is picayune variation in the tones themselves. In other words, depression-frequency particular that lacks local contrast and texture.
For instance, a photo of the night sky with a loftier ISO volition produce some noticeable racket across the heaven – both because of the darker tones, and because the sky has little variation in contrast to assistance "hide" the noise.
In the close crop beneath, you can encounter the pixelation and full general blotchy texture of an empty sky that should be smooth and seamless.

Combine this with the fact that ISO becomes more apparent the longer your shutter is open (due to heating up the sensor), and you lot've got the perfect storm for a high-noise prototype.
This is why astrophotographers are always on the lookout for camera bodies that handle dissonance specially well…considering in guild to capture a photograph in sharp item where the bachelor light is severely limited, y'all have to bump upwardly that ISO quite a scrap.
However, if you were photographing a "busy" scene – such equally the snow image below – the digital noise volition get lost and exist hard to notice. You tin can come across that there is no noticeable difference in noise between ISO 100 and ISO 1600.

The noise is withal there in the image, but the texture and contrast help to hibernate the noise, so information technology doesn't become a distraction. The just noticeable difference is the movement of the snowflakes existence frozen past the faster shutter speed.
Here'southward the bespeak…if yous do find yourself needing to increase your ISO, the goal should be to find the right rest betwixt (1) what is an acceptable amount of noise and (2) retaining detail while exposing your paradigm properly.
I get questions like "Should I e'er increase my ISO?" or "Should I always shoot at the lowest ISO setting?"…which really aren't the right questions to inquire. The answer depends entirely on (1) the quality and condition of your surroundings, and (two) your goals for the image, both technical and creative.
What is the Best ISO Setting for Landscape Photography?
Now when it comes to mural photography, increasing your ISO should be your last resort. Since we are typically using a tripod to stabilize our cameras, unintentional motion mistiness becomes an obsolete reason to increase ISO since we are not photographing while handheld.
However, if yous take artistic or aesthetic reasons for retaining a specific f/stop and/or shutter speed and y'all need to brighten your image a bit to bring it up to the proper exposure….then you can beginning debating whether or not to increase your ISO.
Information technology'south important to mention that technology has made leaps and premises over the by few years when it comes to improved ISO performance, as photographic camera manufacturers take listened well to the needs of depression-light and night photographers. Not too long agone, a photo of smooth texture taken at 1600 ISO or college would be completely unusable…simply now, yous can achieve neat results with a bit of noise removal.
Central TAKEAWAY
ISO will amplify the existing noise in your image…and then depending on the content, the dissonance may be barely noticeable or extremely distracting. The goal is to find a pleasing residue between (i) what you lot desire to achieve, and (2) the limitations of your gear – and whether or not the side effects of a college ISO is worth the outcome.
iv. Minimizing Noise from ISO
Removing Dissonance in Mail service Processing
Speaking of noise removal, you're probably aware already that you tin can lessen the appearance of noise later on in processing. Lightroom is my favorite plan for removing noise since you lot accept a great amount of manual control over both the quality and accuracy of your dissonance removal attempts, where other programs tend to automate the process and the results can be hit or miss depending on the content.
You should be enlightened that removing racket will soften the texture and contrast of your paradigm. Since you're effectively removing sharpness to counteract the noise, this can degrade the quality of your photograph.
This is why it'southward ideal to avoid dissonance altogether, since intense dissonance removal tin can actually brand your paradigm less appealing than if you merely left the noise in and dealt with the lark.
With that in mind, dissonance removal should only be used when necessary…which ways that the noise is overly distracting or otherwise detracts from the story you're trying to tell.
In that location is an exception though. If you're removing noise from an surface area where sharpness is Non important (such equally the empty nighttime sky above, or still water), then noise removal will merely assist your prototype since yous don't have to worry about retaining texture.
This is why noise removal software is nigh powerful when you lot take the option to control the forcefulness of information technology locally. In other words, you tin can cull WHERE in your frame to apply noise removal to, and where to exclude information technology…and tin utilise it at different levels of intensity.
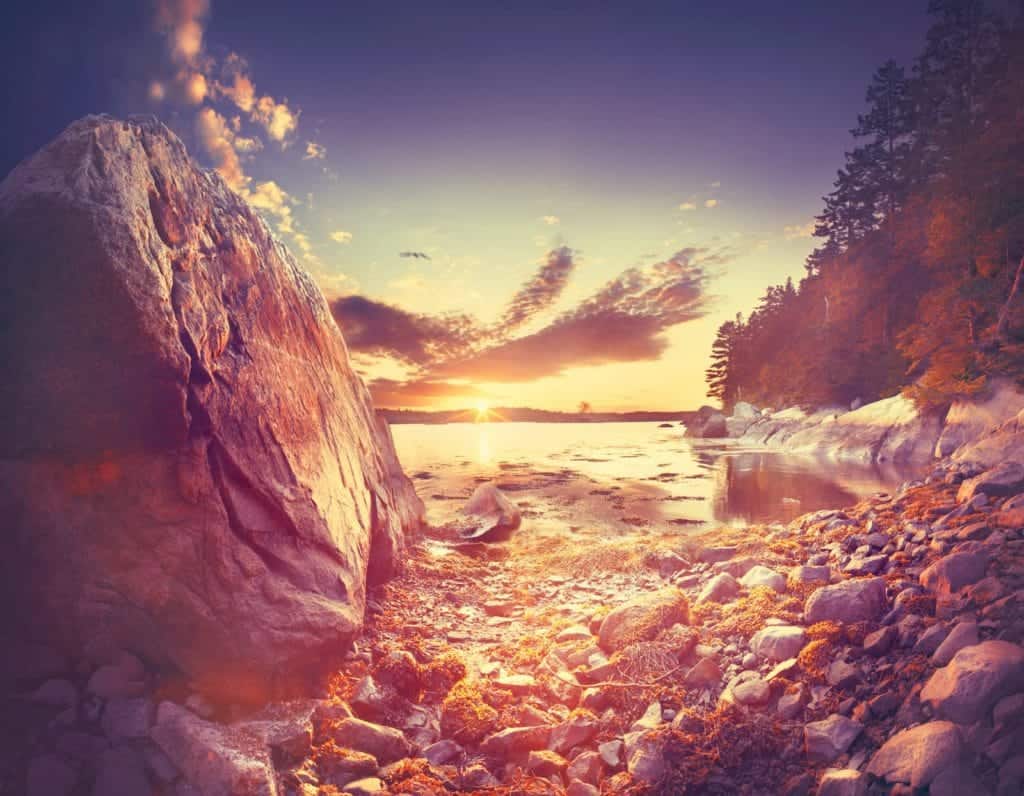
For example, in the image above, I don't have to worry well-nigh retaining sharp texture and dissimilarity in the sky or most of the reflection in the h2o…so I can be quite heavy with my noise removal there. Thankfully, smooth texture like this is also where noise is most obvious.
However, if I applied the same force of noise removal to the rocks and sand in the foreground or the tree line, that would greatly impact my texture and contrast and make the image appear soft and fake. Fortunately, noise is hidden well in loftier-frequency areas like this and then I don't accept to worry about removing information technology from those areas.
Lightroom has a fantastic characteristic for removing racket locally and will automatically apply it more heavily to low-frequency, smooth areas…while attempting to retain contrast and texture along sharp edges.
Sensor Size and Dissonance from ISO
The size of your camera sensor too controls how obvious the noise is for a given ISO setting. The larger the sensor, the more "breathing room" the pixels accept around it…and thus, the noise produced is less obvious.
This is non to exist confused with megapixel size, which is how many pixels are packed within a specific sensor.
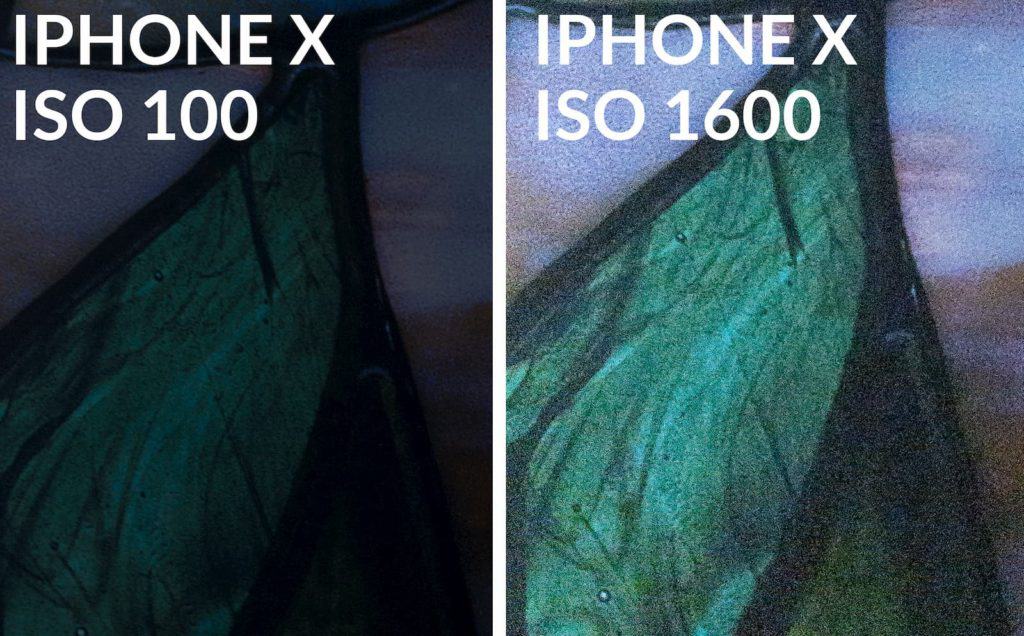
ISO functioning and noise is one severe limitation to iPhone photography…the very small sensor size will give you lot noisy images at college ISO settings.
In the images beneath, you can run across the difference in noise, sharpness, and colour purity betwixt ISO 100 and ISO 1600 for the iPhone X.
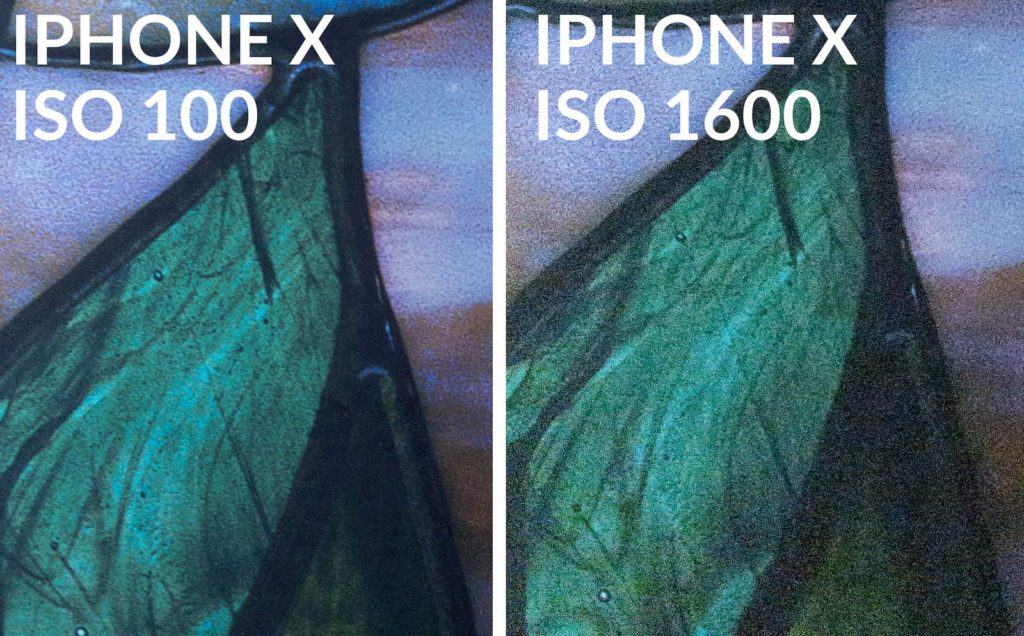
However, on a mirrorless or DSLR camera with a much larger sensor, the noise is much less noticeable when comparing the same ISO settings. For the comparison below, I used a full-frame sensor.
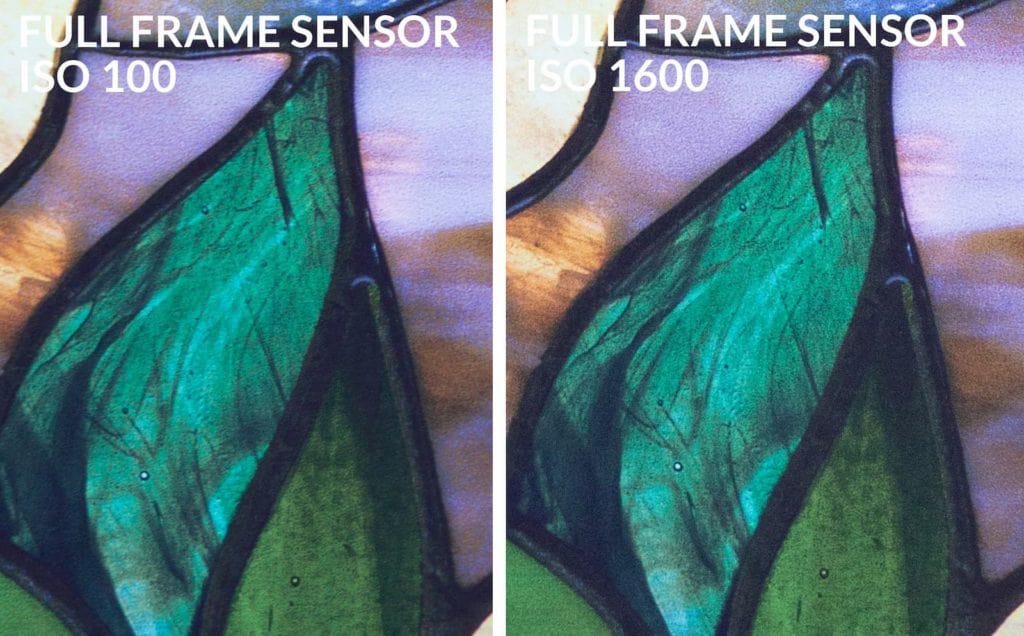
Currently, there'due south merely no way for compact sensors on phones and tablets to compete with the much larger sensor size of mirrorless or DSLR camera bodies.
On another note: downsampling will also reduce the appearance of dissonance, which is why JPGs uploaded to Facebook or Instagram oftentimes appear noiseless.
KEY TAKEAWAY
Removing noise comes at a price: softening of particular. Even so, whether or non this is detrimental to your paradigm will depend on the content. Polish texture can handle heavy noise removal, while abrupt texture tin can only accept a piffling removal. If you have a lot of racket, don't try to remove ALL of it…merely just plenty where it's not a lark.
5. When Should I Increase my ISO for Landscape Photography?
General Recommendations
First, I recommend to never use auto ISO. It can be helpful when you're not sure what ISO setting to utilise for a given aperture/shutter speed…but more often than not, you lot'll forget to turn this feature off before your next outing. Which ways you may inadvertently ruin a perfectly expert photograph with excess racket, and/or have no control over your shutter speed and yous don't know why.
For me, I practice a lot of long exposures then it'due south simply not worth the hassle of turning it on and off, then I always adjust my ISO manually – and only when I require it.
If you're using a tripod, and your shutter speed is not a factor, and then your ISO should always remain at 100 (or whatever your native base ISO is) for the highest quality detail and maximum dynamic range.
Withal, there even so needs to be enough environmental calorie-free captivated by the sensor at your chosen shutter speed/aperture combination. Purposefully underexposing the image in order to capture information technology at ISO 100, and and so artificially increasing the exposure in processing does non always requite y'all the best prototype quality. Even in raw format, this will sometimes produce WORSE racket in your deeper shadows…and also, you may exist missing out on capturing the original texture and colour purity in the field.
The point is that there is no concrete answer equally to whether or not you should adjust your ISO; you need to evaluate your surroundings and the ISO performance of your camera to determine whether or not you should bump up your ISO.
Increasing ISO for Handheld Photographs
Of course, if y'all ARE working hand-held, so increasing your ISO becomes a more common requirement…since a slightly noisy photograph is normally preferred over blurring out the particular birthday from photographic camera milkshake.
If you find yourself in a low-low-cal situation without a tripod (i.e. indoors or during the twilight) where y'all've opened your aperture every bit far as it will go and still can't get a precipitous enough image (or you want to stay at a certain aperture for creative effects), and then information technology's well worth increasing your ISO in order to capture the moment.
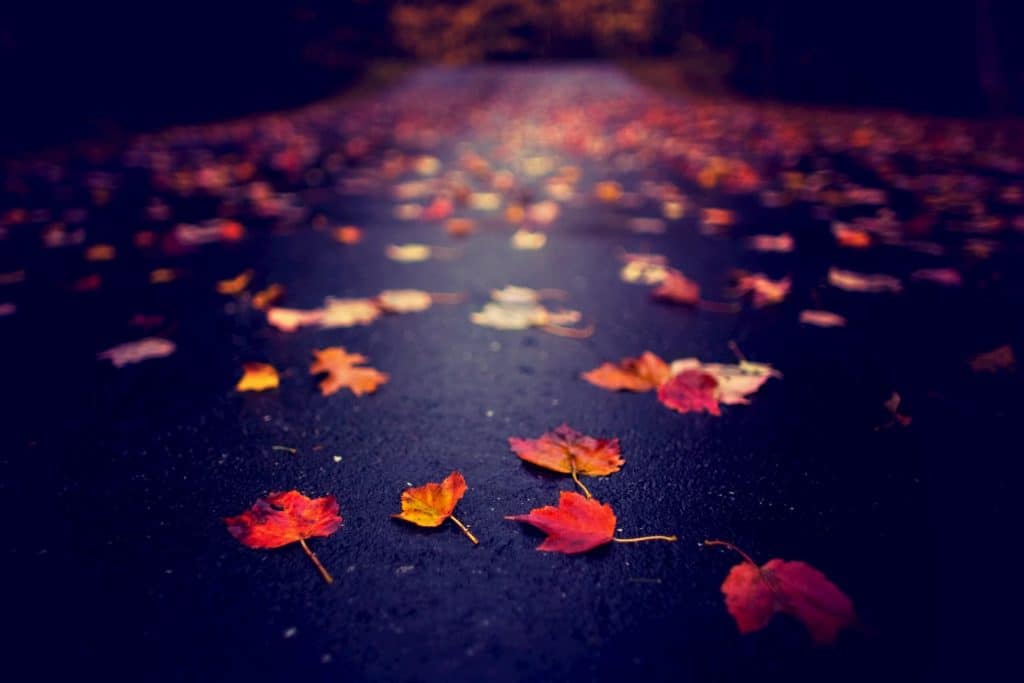
Let's say you're photographing under little available lite (like in the epitome below) and you have to work handheld. Y'all can't widen your discontinuity in club to retain a deep depth of field; compromising that would produce much softer detail in the background trees, which would ruin the photo.
The alternative here is to increase the ISO and bargain with a bit of added noise. Since there is much texture in the scene, the dissonance will be hidden well….and any small areas of smooth texture where noise is apparent tin can be removed easily.
Focal length also plays a function here when photographing handheld. Longer lenses require a faster shutter speed to avoid camera shake – typically twice as fast every bit the longest focal length for that lens. So for a 24-70mm lens, the slowest shutter speed you could use to capture a abrupt photo while handheld would exist 1/140th of a second…rounded upward to the nearest shutter speed of 1/250th of a second.
If y'all like wild animals photography, then you will find ISO to be especially helpful here. When tracking birds or other fast-moving subjects, beingness tied to a tripod is frequently not an selection…so camera stabilization becomes a very important factor.
To exacerbate the stabilization problem fifty-fifty farther, you volition ofttimes be (1) photographing with a very long lens, and (2) need a very fast shutter speed to freeze fast-activity movement from wild animals. This ways that even with aplenty corporeality of available light, you will probably notwithstanding need to increase your ISO.
This is why wildlife photographers will oftentimes search for a camera with extraordinary ISO operation so they take the near leeway with their shutter speed.
Increasing ISO for Mounted Images
Even if your photographic camera is mounted to a tripod (thus eliminating any movement from camera shake), you'll however find yourself in situations where an ISO crash-land is needed to retain your artistic vision for an image….the aesthetic effects of a specific shutter speed and/or discontinuity.
For case: if you lot desire to freeze motion under limited available lite, you'll probably have to increment your ISO a flake so you lot can properly expose the epitome at a fast shutter speed.
Or peradventure yous're photographing moving water and yous found a overnice shutter speed sweet spot that retains some texture, like in the prototype below.
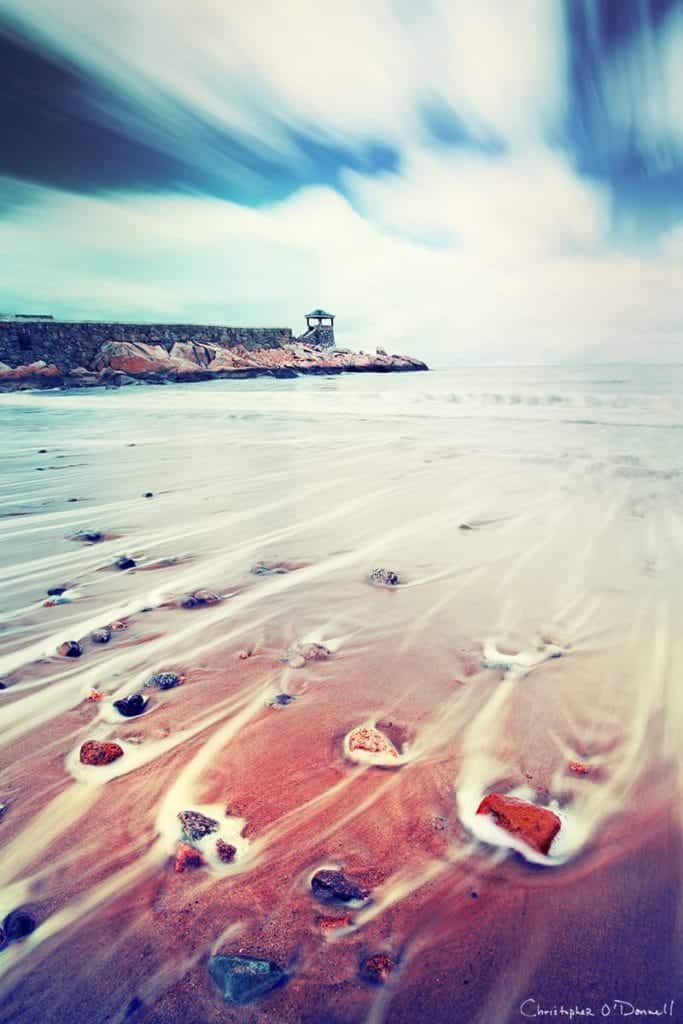
I wanted to create streaks of water around the rocks as the tide receded. A slower shutter speed here would have blurred the water out also much and eliminated that overnice wave texture, but a faster shutter speed would take created sharper lines and dissimilarity, which I did non want. The shutter speed here was just what I was looking for.
As well, I wanted good foreground to background sharpness, and then my aperture needed to stay small for a deep depth of field.
If I had a lower amount of bachelor low-cal here and my image was underexposed, I would need to increase my ISO a bit to get the proper exposure without having to compromise my depth of field or my shutter speed.
Every bit mentioned earlier, astro and night photography will oftentimes crave you to use a high ISO in lodge to capture your image within a reasonable amount of time. In the epitome below, I used a very broad aperture (f/1.iv) and a tripod, but even with that massive aperture letting in every bit much available lite as possible, my shutter speed was well over 300 seconds and All the same underexposed.
In retrospect, I should take increased my ISO a bit to properly expose the image in the field instead of artificially increasing the exposure in post-processing. This would have given me the highest quality detail.
Fundamental TAKEAWAY
Generally speaking: you should ever keep your ISO at the base native setting – normally ISO 100. If yous're shooting handheld, need to freeze fast action, and/or shooting at night… the decision to increase ISO will be more than common. Nonetheless, if using a tripod and/or there is little movement in your frame to compensate for…yous will rarely demand to increase your ISO.
How to Cull the All-time ISO for Your Landscape Photograph
When in the field, this is how I generally approach a scene and decide whether or non I'm going to increase my ISO above the base setting.
First, I motion into aperture priority fashion and select the correct f/stop for my desired depth of field. For me, this is the about important selection for landscape photography.
Next, I decide what shutter speed is necessary for that depth of field. Normally, I'll meet what the camera thinks the optimal shutter speed should be for a given discontinuity as this at least gets me in the full general vicinity, and then I'll use my histogram to fine-tune if needed.
However, if I require a certain shutter speed for artistic purposes, that is when I may pull the "emergency switch" and increase my ISO. If there is too much light striking the sensor for a given discontinuity/shutter speed, I'll attach ND filters. If there'south non enough lite, I'll bump up my ISO.
My process may vary a bit depending on the unique challenges and goals for an paradigm, but this is the full general workflow I follow.
half-dozen. Summary
You can see how your ISO, shutter speed, and aperture work together to create what is called the exposure triangle. If you increment your ISO, y'all make the image brighter for a given shutter speed. If you change your shutter speed, y'all increase or decrease the corporeality of time that the light is exposed to your sensor – which means that yous need to either widen or close your aperture to compensate.
Alternatively, if you adjust your aperture for a unlike depth of field, yous need to change your shutter speed to compensate for the increased or decreased amount of light let in through your lens.
In short, all three settings piece of work in harmony to create the exposure you desire – you can't adjust i setting without changing another if you want to maintain the same exposure – or level of brightness.
Lastly, I would recommend that you test the ISO functioning of your specific photographic camera body, as the quality tin vary greatly from model to model. Photograph a smooth (depression-texture), dark subject and increase your ISO for each frame, making sure to use a tripod for stabilization.
This will give you a clear representation of how much noise is present for each ISO setting…and you lot tin decide your maximum tolerance level now without having to do test shots in the field.

Source: https://creativeraw.com/what-is-iso-simple-guide-beginners-manual-mode/
Posted by: weekslontoll.blogspot.com
0 Response to "What Is Iso On My Camera"
Post a Comment